Baked Chicken

Standard

I decided to make baked chicken again today. However, I ran out of the fried onions that I used last time and I also ran out of bread crumbs. I looked up alternatives to bread crumbs and people suggested pork rinds or almonds. Another suggestion was to make your own bread crumbs if you didn’t have any that are already prepared. Of course, I ran out of bread as well, so I couldn’t use that to make my own bread crumbs. Due to my financial situation, I was unable to go to the store to buy the ingredients that I needed. As such, I used whatever resources were available to me at home. I decided to go with the almond alternative. However, I didn’t have any almonds. The closest thing to almonds that I had was walnuts. I decided to use the walnuts to see how they’d work.

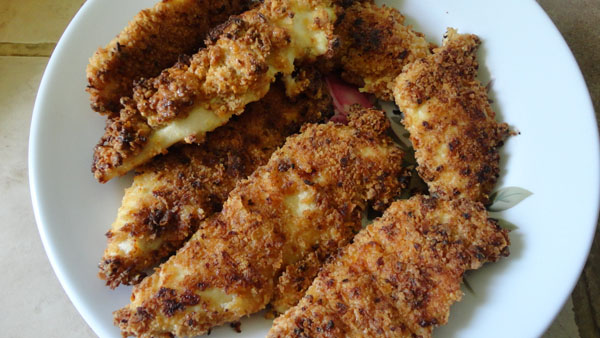
Preparation for the ingredients took a few minutes. I had the directions of the French Fried Onions in mind, so I used those steps. The difference this time was that I added garlic salt and paprika into the egg yolk. I wanted to give it more flavor. I didn’t use measuring spoons when I added the garlic salt and paprika. I just sprinkled a little bit of each. I probably didn’t sprinkle enough of each. I didn’t crush the walnuts enough. There were still some chunks. My chicken turned out plain in taste. According to my brother, it was edible, but plain. It was more crunchy than crispy. The walnuts and flour were what could be tasted the most. It’s like the other ingredients weren’t even present at all. I’m not much of a walnut lover, so it tastes plain to me even though it’s supposed to have a certain flavor. At least the inside of the chicken was juicy. It’s too bad that the exterior isn’t tasty.

Ingredients I used for the baked chicken:

1 Egg (beaten in a bowl)
5 pieces of chicken (from Drumsticks)
Garlic salt
Paprika
Walnuts
Flour

Steps I used for preparation:

1. Preheat oven to 400 degrees Fahrenheit.
2. Line the baking plate with foil.
3. Make the “bread crumbs.” Place walnuts and flour in a Ziploc bag, close the bag, mix (shake) the flour and walnuts, crush the walnuts, and place them in a plate.
4. Beat an egg in a bowl and added garlic salt and paprika.
5. Dip the chicken one by one in the egg yolk and roll them in the “bread crumbs” one by one.
6. Place the coated chicken pieces in a baking plate.

French’s French Fried Onions Chicken Breasts

Standard

I made chicken breasts covered with French’s French Fried Onions today. I wanted to try it because it looked appetizing on the commercial. I wanted to know what it would taste like. My finished product didn’t turn out as lovely as the commercial showed. That usually happens to me anyways. My French fried onions covered chicken breasts came out slightly burnt. The directions said bake it at 400 degrees Fahrenheit and to leave it in the oven for twenty minutes. I left mine in for fifteen minutes. I didn’t think my oven would bake that well. Sometimes, it doesn’t even want to heat up. Within about ten minutes, the fried onions were already starting to burn one one side. I flipped it to the other side so that the other side would bake as well. At least next time, I’ll know to leave it in about ten to fifteen minutes. Hopefully, that will make it a golden color. The directions also said to use four chicken breasts. I had some leftover French fried onions after the fourth chicken breast, so I added two more. The chicken breasts that I had were small. Despite that, by the time I got to the sixth chicken, the French fried onions didn’t want to stick to it. There wasn’t that much left, either. As a result, one side of the last chicken wasn’t completely covered.

My brother ate them because there wasn’t any food cooked yet prior to me baking the chicken. He said that it didn’t really have any flavor and tasted a bit dry. Well, that was my fault. I underestimated the heat of my oven. The slightly burnt exterior didn’t help either. I think if I had lowered the heat, it might have helped the chicken from being burnt. It probably would’ve made the chicken juicier as well. I don’t know if the size of the chicken breasts affects how juicy it is, but I think it might. The ones I used were small and somewhat thinly sliced. I wanted to try the fried onions that had cheddar because cheese always gives food a kick to the taste for me. Hopefully next time, my chicken will turn out better.

Spicy Red Curry

Standard

My mom made Spicy Red Curry. It’s similar to what I’ve posted in my Red Curry with Beef and Chicken Stir Fried Noodles entry. However, this curry doesn’t have carrots and red bell peppers like the other one. It does have beef and green peppers though. Unlike the other curry, this one is spicy. It’s not spicy to the point where you can’t consume it, but it’s spicy enough to give the flavor a kick. I don’t know if the spice came from the curry paste itself or if my mom added some pepper ingredient to it. Either way, it’s tasty and spicy. It’ll make you thirsty. This is the kind of curry that I like to eat with rice.


Crescent Rolls

Standard

I made crescent rolls the other day. Of course, I didn’t make them from scratch. I bought the canned crescent rolls dough. The brand I bought was Sunny Select. The problem with my crescent rolls was that they didn’t look like crescents. I said to my brother, “They don’t look like the picture on the can!” They look more like chicken or turkey drumsticks. Perhaps I didn’t roll them as well as I should have or maybe I rolled them incorrectly. I’ve used this brand of crescent rolls before when I made “pigs in a blanket.” In that case, they weren’t meant to look like crescents. Years ago, I used the Pillsbury brand and my crescent rolls actually looked like crescents. I don’t know if it’s because of the brand of dough or if it’s because of me. Let’s just say both are responsible. That’ll make it fair. When my sister saw the crescent rolls, she thought I made “pigs in a blanket” again. She thought this because she saw that there were cooked hot dogs next to them. She said, “Whoever made ‘pigs in a blanket’ made it wrong. You’re not supposed to make them separately.” To this, I replied, “I wasn’t trying to make ‘pigs in a blanket.’ I saw that we had a can of crescent rolls left, so I decided to make them. I figured they wouldn’t be very fulfilling, so I made hot dogs as well.” Even though my crescent rolls didn’t look like what they’re supposed to, people ate them anyways. “They didn’t look like crescent rolls” wasn’t a good enough excuse not to consume them. Since I did bake them, I didn’t want them to go to waste.

Grilled Cheese Sandwiches

Standard

I made grilled cheese sandwiches today. They were the best I ever made. The cheese was actually gooey! Every time I make grilled cheese sandwiches, the cheese never melts. No matter how hot the bread got, the cheese wouldn’t melt. I suppose it was because the way I made it. I pretty much just put cheese in between the bread slices and heat the outside of the bread. I spread butter on the outside bread slices. Today, I did something slightly different. I melted butter in the pan to coat both sides of the bread slice. I heated up one side, placed the heated side face up on a plate, and placed the cheese on it. Then, with the second bread slice, I heated up one side and placed the heated side faced down onto the cheese. I pressed down gently on the bread slice to apply the heat on the cheese. Then, I slid the spatula underneath the very bottom of the sandwich and placed it into the pan. I left it for a few seconds until it heated up. When that was done, I flipped it over and did the same thing to the other side. I kept repeating this until I had the desired number of sandwiches. After every completed sandwich, I stacked each on top of each on the plate. The newer sandwiches helped generate heat and helped melt the cheese even more.

Another thing I did differently this time was that I didn’t burn the bread. I had a tendency to leave the bread in the pan longer than I should. I also used to cook on higher heat. This time, I set the heat on medium. The process today took longer than when I usually make grilled cheese sandwiches, but it was worth it. My brother told me that he looked up how to make them and someone said to melt butter on the bread in the microwave. I suppose I didn’t have to do that after all. Unfortunately, I didn’t take any photos of the finished sandwiches. I made them because I was hungry and I couldn’t wait any longer after they were completed.

Bread and Curry

Standard

Yesterday, my mom made curry! I like curry, especially when it’s eaten with bread. It just tastes better that way. It goes well with French bread. It’s not that great for me when it’s eaten with Sourdough bread. Curry can also be eaten with white rice. The Thai restaurant in my city has curry as a dish. I don’t like it as much as I like my mom’s curry. It lacks something, but I still like it. Sometimes, my brother’s friends would bring curry over to my house. Their curry is all right, but it still doesn’t compare to my mom’s. Curry can have different colors of the soup. My mom usually makes red curry. I think she made yellow curry before, but I didn’t like it as much. Hooray for curry! =)

Red Curry with Beef and Chicken Stir Fried Noodles

Standard

Today my sister made Red Curry and Chicken Stir Fried Noodles. The Red Curry had beef, carrots, green beans, and red bell peppers. It was good. It wasn’t spicy like I thought it would be. I didn’t finish it though because I had eaten the Stir Fried Noodles first. The Stir Fried Noodles were good as well. My sister made it because her best friend wanted to learn how to cook the curry. Below are pictures I took of each.

Red Curry with Beef:

Chicken Stir Fried Noodles

Red Curry with Beef, Chicken Stir Fried Noodles, and rice: